Tuesday, February 12, 2008

habanero and spinach beans


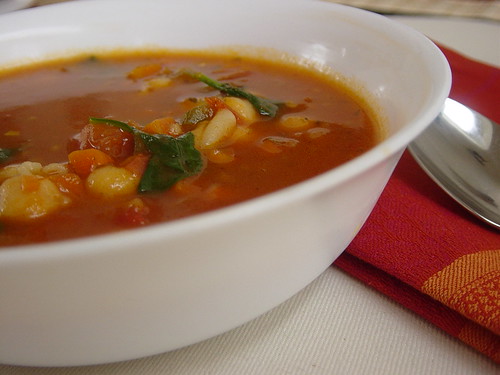
the story: This dish is not really a new one to me or those who have tasted my cooking. There are some differences in this one, namely the habanero pepper. There are some other alterations to the dish but the essence of it is the same. One of the big differences is that this one would make a spectacular dip if you puree it. I haven't tried it yet, but i tried it with some tortilla chips and it was very tasty. With a little monkeying with the recipe, I was able to develop a smooth and steady heat with a little bit of lime citrus to create a depth to the flavor. The green earthiness of the spinach and the sweetness of the caramelized onions was nicely counterpointed by the pungent sauteed garlic.

The dish: habanero and spinach beans with basmati rice

1 can of pinto beans (baked beans are a good substitute for this)
1/4 of a Spanish onion
1/2 cup of spinach (frozen worked best for me)
1/3 cup of sliced white mushrooms
1 small habanero pepper
3 cloves of fresh garlic
6 dashes of red white vinegar
2 tablespoons of kc masterpiece BBQ sauce
1/4 cup of water
1/2 of a fresh lime
1 teaspoon of dried cilantro
1 cup of Basmati rice

Boil up two cups of water with a little bit of oil and salt. When its boils lower the flame as much possible, toss in the rice stir and don't touch it for a good 15 minutes at least. In the meantime heat up a little oil in the pan and when its hot toss in the onions. Let those cook till they start to become translucent and caramelize. Now its time to toss in the garlic, spinach, red wine vinegar, and the habanero, and the beans. Let that cook for 5 or so minutes, and then add the water and the barbecue sauce. Toss in the cilantro and the mushrooms, lower the heat and let it simmer for 5-10 minutes. Stir occasionally. Add the lime juice last, otherwise the heat will break down the citrus flavor. Plate with the rice underneath and serve with fresh stone ground tortillas.

Eat and enjoy!!

Friday, January 25, 2008

Spinach and Asiago Stuffed Mushrooms


The Story: So as Kourtney and I like to explore, culinarily speaking anyway, and so we decided to finally explore Whole Foods. If you're not familiar with this store its something of a high end organic sort of supermarket but with some very nice counters like the bakery and the pizzeria. Anyhow it was our first time there and we enjoyed ourselves immensely. We found veggie pepperoni, these terrific yukon gold garlic chips, as well as some magnificent cheeses. Other than some great gelato we sampled, we came across some very creatively stocked salad bars. This is where we got the inspiration for this recipe. It was made on a night when we were feeling particular ambitious in terms of cooking, and we certainly went all out.

The Dish: Spinach and Asiago Stuffed Mushrooms

6 or 7 large white mushrooms (the larger the better)
3-4 strawberry tomatoes
1 shallot
2 cloves of garlic
1/2 cup of spinach
2-3 tablespoons of canola oil
4 tablespoons of Parmesan cheese
1/4 cup of freshly shredded Asiago cheese
sea salt and black pepper to taste
6 tablespoons of panko bread cumbs

Making these are quite simple. Wash the mushrooms, removing the stems and carving out a little of the interior if necessary. Place the spinach in bowl and mix with the shallots and garlic. Add the oil and mix thoroughly. Add the Parmesan and then mix again. Mix in about half of the bread crumbs. Place a large spoonful of the mixture inside each of the mushrooms. On top of the mixture place the shredded Asiago and the remainder of the bread crumbs. On top of that add a halved strawberry tomato. Place on a oiled baking sheet, and lightly spray the sides of the mushrooms. Bake at a 375 degree heat for 15-20 minutes.


Eat and enjoy!

Tuesday, January 8, 2008

a basic pizza recipe


The story: The recipe for this one goes back a ways actually. Some time ago, three or four perhaps, I discovered this really simple pizza dough recipe. It truly is easy. I began to experiment with the recipe in various ways, ranging from my extremely well received bread sticks, to my messy but tasty calzones. I even use this recipe as a base for a garlic and za'ahtar loaf. Anyhow the dough takes a while to rise, despite its simplicity, but its totally worth it. I've never had a complaint with this dough. Despite all of my experimentations the original intent of the dough is one of the best, so here we go.

the dish: pizza
dough:
5 cups of flour
2 tablespoons of sugar
2 teaspoons of salt
2 packets of yeast
2 cups of water
Pizza toppings:
8-9 oz. of mozzarella
1/4 cup of Asiago cheese
1 large tomato
1/2 cup of red onion
1/2 cup of white mushrooms
1/4 cup of pineapple
1/3 cup of frozen spinach
1/4-1/2 cup of Di'Nicolla spicy marinara sauce
salt, pepper, and Italian spices to taste

The dough is the only part of this dish that requires much attention or thought. Take all of dry ingredients for the dough and mix them in a large bowl. You may want to proof the yeast before you mix it in, but its not really that necessary. Slowly add the water to the bowl, mixing until all of the water is in it. Now you kneed it. It may seem like the dough is a bit dry but if you keep kneading it, you will see that it works out just fine. If it doesn't seem right to you, which might happen due to ambient humidity or temperature, just add more water or flour till you're satisfied with it. After you've worked the dough for 10-12 minutes, spray the bowl and the dough with a little oil. Cover it with a wet cloth or paper towel, and let it sit in a warm place for 1 hour. After this hour, punch it down, and let it sit for another hour. After that hour, punch it down again and place it plastic wrap and put it in the refrigerator for 1 hour. This will make the dough much easier to work with when its time to roll it out. When its time to roll it out, cut it into two separate pieces. This recipe makes two pizzas, or I guess one pretty big pie. Roll the dough out as thin as you can, even if it may seem a bit thin it will rise in the oven nicely. Place the rolled out dough onto a oiled baking pan. Now all you have to put on the sauce, veggies, and cheese. The only thing that you might want to do that is different, is only half defrost the spinach in a microwave. The extra moisture from the spinach will make the pizza quite delectable. Place in a preheated 450 degree oven for 20 or so minutes.

Eat and enjoy!

Sunday, December 30, 2007

a Mighty Minestrone soup


The story: Well to be perfectly frank there is not a whole lot of story behind this particular soup. The general recipe is an emulation of this terrific Italian restaurant's soup, Gusto, which is relatively close to me. The main reason I go to this place is for their spectacular eggplant dishes, of which I can't think of anyplace making better, but the bread and the soup that also comes with the meal is great. The recipe is pretty simple as these things go, though at the time of the making of it I didn't quite have everything I needed, it still turned out well. Sadly for many the height of this popular dish is at the Olive Garden, but as I'm sure more than a few might agree that Olive Garden is to Italian as French Fries are to France. As a side note, while the soup largely freezes well, when it comes to defrosting it does sometimes turn the noodles to mush.

*Image taken from Flikr

The Dish: Minestrone soup

5 cups of water
1 cup of vegetable stock
1/2 cup of carrots (sliced thinly)
1 can of diced tomatoes with the juices
1-2 fresh tomatoes
1 small potato (cubed)
3/4 cup of mushrooms
1 can of white kidney beans
1/2 of a medium onion (chopped fine)
2-3 tablespoons of tomato paste
1/4 cup of organic ketchup (more if you want a richer soup)
1/2 cup of dry macaroni
2-3 teaspoons of red wine vinegar
1 teaspoon of fresh ground sea salt
1/4 teaspoon of black pepper
fresh basil to taste
fresh rosemary to taste

Cooking of this dish is quite simple, like most soups. Bring the water and the veggie stock to a boil and then simply add all of the vegetables. The only exception to this would be the potato. The preparation for this is a bit different. First peel the potato and then microwave for 4 minutes or so. This will really help soften it up for the soup. Add the somewhat cooked potato at the same time as the other veggies. Allow this to cook for 10-15 minutes and then add the tomato paste and the ketchup. After this is well mixed into the soup, add the macaroni and let it cook in the soup. Add the salt and pepper, and then the vinegar. Finally add fresh herbs. You might want to add a small amount of corn starch mixed with water into it, if you prefer a thicker soup. Make sure that the macaroni is a little chewy when you serve it, as it gives the soup more texture.

Add a bit of Parmesan Cheese and serve with well toasted fresh Italian bread.


Eat and enjoy!!

Friday, December 28, 2007

Orange Italian Chicken


Okay Story: So I, Kourtney, actually made this dish a while back but we, Gabey and I have fallen so behind in our blogging I thought it was time to catch up. So Gabey was making some udon noodles for dinner he had leftovers so I decided to do something fun. This was originally made for one person but can be easily multiplied for your dinner party.

Ingredients
1 boneless skinless chicken breast
Shallot or onion to taste ( I like a lot of shallot)
2 cloves of garlic
2 teaspoons of Italian seasoning
3/4 cup of your favorite marinara sauce
Udon Noodles
1 large orange- juice and zest
Handful of cashews
2 splashes of Dr. Pepper-----trust me------

The key to making the chicken so yummy is the following: Cook the chicken in all of the above! Saute the shallot or onion and garlic in 1 teaspoon of olive oil for a couple of minutes turn the heat down and pour in your marinara sauce. It is important to turn the heat down so the sauce simmers but does not pop out of the pan. Add Italian seasoning and stir till its well blended. Place chicken in pan and cushion it around the sauce. The sauce will start to become slightly thicker at this point add the juice of one orange and about 1/2 teaspoon of zest (add more if you like). So heres the fun part, trust me on this! Adding two splashes of Dr.Pepper will cut some of the acidity of the orange juice and highlight the sweetness of it. Let this simmer until the chicken is throughly cooked. The Chicken will be tender and flavored with your sauce. Simply add udon noodles and roasted or raw cashews to the pan and let them soak up all the yummy goodness! I promise this wont disappoint!

Thursday, December 13, 2007

Beet couscous


The story: As I had mentioned in the previous post I had created a Mediterranean themed dinner for some Israeli friends of ours. This is one of the other dishes that I made for dinner that night. This dish was inspired by an episode of Iron Chef America in which Mario Vitali made this gorgeous couscous dish that I just had to emulate. Interestingly, my adaptation of his recipe had something of a different result. My couscous, when done and plated looked a great deal like pomegranate seeds. Neat huh? The beet juice and chunks of beet used for dish do not really add much in the way of flavor to it, it more for appearance and to have a bit a vegetable in there. Overall the taste itself is rather mild, lacking the usual kick I put in my food, but for that same reason it stands out even more.

Again this is a stock photo, but the dish look exactly the same!


The dish: beet couscous

1 cup of Israeli couscous (israeli couscous is larger and has more texture to it)
3/4 cup of water
1/2 cup of beet juice (I just used the juice from the beets in the can)
4 scallions
1/4 cup of beets
1/2 tsp of garlic
1/4 tsp of ground sea salt
1/4 tsp of ground black pepper

Bring the mixture of water and beet juice to a boil. Add the scallions and beets, and let it continue to boil for another 2-3 minutes. Add the spices, and stir a few times. Lower the temperature to a simmer and add the couscous, cooking for 7-8 minutes, stirring occasionally. Due to the size of the couscous, it takes a bit longer to cook than the regular kind. It also has a more chewy texture to it, and tends to be more clumpy. After the couscous has reached the desired texture, take it off the heat and immediately place in the dish you're serving it in. I used a neat little trick, placing the couscous in a bowl with a wide rim, and then placing another bowl upside down on top of it. Remove the top bowl just before serving. It creates a very clean and solid look for dish.

Eat and enjoy!

Za'ahtar Chicken


The story: So Kourtney and I were having a few of our Israeli friends over for dinner and we were debating what to make. A heavily vegetarian menu was constructed with all kinds of neat things. This is one of them. This was actually the first time I've ever had to cook meat before. I became a vegetarian at the ripe old age of seven, so my meat experience is meager to say the least. Normally Kourtney would be the one to take care of it, but she was at work so it fell on my very capable shoulders. The basic concept behind this dish is one of simplicity, taking a few ingredients and creating a moist chicken dish with a simple and clean flavor. I must say that it was extremely well received by everybody. I must say I'm very proud of that, especially because I could not taste things along the way to make sure they tasted right. Over all this dish have a very Mediterranean flavor to it, with the olives really making the flavor of the olive oil pop. The flavor of the chicken was further accented by some of the other dishes I made, which I will probably write up at another time.

Sadly as it was rather late at night that we sat down to dinner, I didn't get a chance to properly photograph the dish, so this stock photo will have to do.

The dish: Za'ahtar Chicken with olives

2 packages of skinless boneless chicken breast. (a total of six pieces)
2-3 cups of Japaneses panko bread crumbs (important to use these, instead of normal breadcrumbs)
1/4 cup of za'ahtar (approximately)
2-3 tsp of garlic powder
1/2 cup of green olives
1/4 -1/3 cup of olive oil

First preheat the oven to 375 degrees. Take two large bowl, and place the olive oil in one and the bread crumb and spice mixture in the other. Thoroughly blend the spice and breadcrumb mixture until you have a uniform light green appearance. Before dealing with the chicken, take a pan and line it with foil, and then spray it with oil. Now for the chicken. As I dislike meat, I chose to wear gloves when handling the chicken, though in general its smart to do so anyway due to the possibility of bacteria. Take each chicken breast and thoroughly coat it with the olive oil. Next place in the breadcrumb mixture bowl, and coat the chicken. Don't be afraid to press the mixture onto the meat. You may have to refill the mixture bowl a bit during the process. When coated, place the chicken in the pan, and give them a very light spray of oil. Next chop up the green olives and gently place them on top of the chicken. If you just toss them on, you might knock off some of the breadcrumbs, leading to an uneven coat. Put in the oven, let bake for 35-45 minutes, depending on how done you like your chicken. I had it in for around 45 minutes and I was told that it was very tender and juicy. Let cool for 5 minutes before serving.

Eat and Enjoy!!