Sunday, December 30, 2007

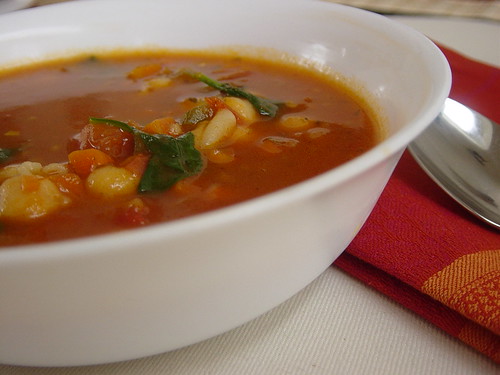
a Mighty Minestrone soup


The story: Well to be perfectly frank there is not a whole lot of story behind this particular soup. The general recipe is an emulation of this terrific Italian restaurant's soup, Gusto, which is relatively close to me. The main reason I go to this place is for their spectacular eggplant dishes, of which I can't think of anyplace making better, but the bread and the soup that also comes with the meal is great. The recipe is pretty simple as these things go, though at the time of the making of it I didn't quite have everything I needed, it still turned out well. Sadly for many the height of this popular dish is at the Olive Garden, but as I'm sure more than a few might agree that Olive Garden is to Italian as French Fries are to France. As a side note, while the soup largely freezes well, when it comes to defrosting it does sometimes turn the noodles to mush.

*Image taken from Flikr

The Dish: Minestrone soup

5 cups of water
1 cup of vegetable stock
1/2 cup of carrots (sliced thinly)
1 can of diced tomatoes with the juices
1-2 fresh tomatoes
1 small potato (cubed)
3/4 cup of mushrooms
1 can of white kidney beans
1/2 of a medium onion (chopped fine)
2-3 tablespoons of tomato paste
1/4 cup of organic ketchup (more if you want a richer soup)
1/2 cup of dry macaroni
2-3 teaspoons of red wine vinegar
1 teaspoon of fresh ground sea salt
1/4 teaspoon of black pepper
fresh basil to taste
fresh rosemary to taste

Cooking of this dish is quite simple, like most soups. Bring the water and the veggie stock to a boil and then simply add all of the vegetables. The only exception to this would be the potato. The preparation for this is a bit different. First peel the potato and then microwave for 4 minutes or so. This will really help soften it up for the soup. Add the somewhat cooked potato at the same time as the other veggies. Allow this to cook for 10-15 minutes and then add the tomato paste and the ketchup. After this is well mixed into the soup, add the macaroni and let it cook in the soup. Add the salt and pepper, and then the vinegar. Finally add fresh herbs. You might want to add a small amount of corn starch mixed with water into it, if you prefer a thicker soup. Make sure that the macaroni is a little chewy when you serve it, as it gives the soup more texture.

Add a bit of Parmesan Cheese and serve with well toasted fresh Italian bread.


Eat and enjoy!!

Friday, December 28, 2007

Orange Italian Chicken


Okay Story: So I, Kourtney, actually made this dish a while back but we, Gabey and I have fallen so behind in our blogging I thought it was time to catch up. So Gabey was making some udon noodles for dinner he had leftovers so I decided to do something fun. This was originally made for one person but can be easily multiplied for your dinner party.

Ingredients
1 boneless skinless chicken breast
Shallot or onion to taste ( I like a lot of shallot)
2 cloves of garlic
2 teaspoons of Italian seasoning
3/4 cup of your favorite marinara sauce
Udon Noodles
1 large orange- juice and zest
Handful of cashews
2 splashes of Dr. Pepper-----trust me------

The key to making the chicken so yummy is the following: Cook the chicken in all of the above! Saute the shallot or onion and garlic in 1 teaspoon of olive oil for a couple of minutes turn the heat down and pour in your marinara sauce. It is important to turn the heat down so the sauce simmers but does not pop out of the pan. Add Italian seasoning and stir till its well blended. Place chicken in pan and cushion it around the sauce. The sauce will start to become slightly thicker at this point add the juice of one orange and about 1/2 teaspoon of zest (add more if you like). So heres the fun part, trust me on this! Adding two splashes of Dr.Pepper will cut some of the acidity of the orange juice and highlight the sweetness of it. Let this simmer until the chicken is throughly cooked. The Chicken will be tender and flavored with your sauce. Simply add udon noodles and roasted or raw cashews to the pan and let them soak up all the yummy goodness! I promise this wont disappoint!

Thursday, December 13, 2007

Beet couscous


The story: As I had mentioned in the previous post I had created a Mediterranean themed dinner for some Israeli friends of ours. This is one of the other dishes that I made for dinner that night. This dish was inspired by an episode of Iron Chef America in which Mario Vitali made this gorgeous couscous dish that I just had to emulate. Interestingly, my adaptation of his recipe had something of a different result. My couscous, when done and plated looked a great deal like pomegranate seeds. Neat huh? The beet juice and chunks of beet used for dish do not really add much in the way of flavor to it, it more for appearance and to have a bit a vegetable in there. Overall the taste itself is rather mild, lacking the usual kick I put in my food, but for that same reason it stands out even more.

Again this is a stock photo, but the dish look exactly the same!


The dish: beet couscous

1 cup of Israeli couscous (israeli couscous is larger and has more texture to it)
3/4 cup of water
1/2 cup of beet juice (I just used the juice from the beets in the can)
4 scallions
1/4 cup of beets
1/2 tsp of garlic
1/4 tsp of ground sea salt
1/4 tsp of ground black pepper

Bring the mixture of water and beet juice to a boil. Add the scallions and beets, and let it continue to boil for another 2-3 minutes. Add the spices, and stir a few times. Lower the temperature to a simmer and add the couscous, cooking for 7-8 minutes, stirring occasionally. Due to the size of the couscous, it takes a bit longer to cook than the regular kind. It also has a more chewy texture to it, and tends to be more clumpy. After the couscous has reached the desired texture, take it off the heat and immediately place in the dish you're serving it in. I used a neat little trick, placing the couscous in a bowl with a wide rim, and then placing another bowl upside down on top of it. Remove the top bowl just before serving. It creates a very clean and solid look for dish.

Eat and enjoy!

Za'ahtar Chicken


The story: So Kourtney and I were having a few of our Israeli friends over for dinner and we were debating what to make. A heavily vegetarian menu was constructed with all kinds of neat things. This is one of them. This was actually the first time I've ever had to cook meat before. I became a vegetarian at the ripe old age of seven, so my meat experience is meager to say the least. Normally Kourtney would be the one to take care of it, but she was at work so it fell on my very capable shoulders. The basic concept behind this dish is one of simplicity, taking a few ingredients and creating a moist chicken dish with a simple and clean flavor. I must say that it was extremely well received by everybody. I must say I'm very proud of that, especially because I could not taste things along the way to make sure they tasted right. Over all this dish have a very Mediterranean flavor to it, with the olives really making the flavor of the olive oil pop. The flavor of the chicken was further accented by some of the other dishes I made, which I will probably write up at another time.

Sadly as it was rather late at night that we sat down to dinner, I didn't get a chance to properly photograph the dish, so this stock photo will have to do.

The dish: Za'ahtar Chicken with olives

2 packages of skinless boneless chicken breast. (a total of six pieces)
2-3 cups of Japaneses panko bread crumbs (important to use these, instead of normal breadcrumbs)
1/4 cup of za'ahtar (approximately)
2-3 tsp of garlic powder
1/2 cup of green olives
1/4 -1/3 cup of olive oil

First preheat the oven to 375 degrees. Take two large bowl, and place the olive oil in one and the bread crumb and spice mixture in the other. Thoroughly blend the spice and breadcrumb mixture until you have a uniform light green appearance. Before dealing with the chicken, take a pan and line it with foil, and then spray it with oil. Now for the chicken. As I dislike meat, I chose to wear gloves when handling the chicken, though in general its smart to do so anyway due to the possibility of bacteria. Take each chicken breast and thoroughly coat it with the olive oil. Next place in the breadcrumb mixture bowl, and coat the chicken. Don't be afraid to press the mixture onto the meat. You may have to refill the mixture bowl a bit during the process. When coated, place the chicken in the pan, and give them a very light spray of oil. Next chop up the green olives and gently place them on top of the chicken. If you just toss them on, you might knock off some of the breadcrumbs, leading to an uneven coat. Put in the oven, let bake for 35-45 minutes, depending on how done you like your chicken. I had it in for around 45 minutes and I was told that it was very tender and juicy. Let cool for 5 minutes before serving.

Eat and Enjoy!!

Monday, November 26, 2007

Coconut curry soup (tom yom variation)


The story: Well when I lived in Manhattan, I lived down the street from this nice little Thai restaurant, called the Blue Angel. When Kourtney and I would eat there, we would often get the spicy vegetable soup. We both loved it, though Kourtney always gave me the baby corn that was in it. We often thought of recreating the soup, and so we got the ingredients, at least as best as we could find them. I decided to make this soup on a very cold November night, when I had been out doors for a while. This is a great pick me/you up for a day like that. The soup recipe is essentially a tom yom recipe, though I adapted it to a more vegetarian friendly version. Tom yom soup is a very popular, and I might add a rather tasty, Thai soup. I replaced some of the standard ingredients simply because I used what was on hand , as I couldn't find a few necessary ingredients for the original recipe. The resturant has since closed down, but its soup lives on. (sort of)

* Note: Unlike most of the pictures posted, this is not a photo of my own. It is just similar stock photo found on Google images. Obviously mine would not have shrimp on top.

the dish: coconut curry soup (a tom yom variant)
3 cups of rich vegetable broth
1/4 cup of dry sherry cooking wine
1/4 cup of red wine vinegar
1/4 cup of water
2 heaping tbs of coconut milk
2 heaping tbs of red curry paste (green works just as well)
1/3 cup of chopped shitake mushrooms
1/4 cup of thinly sliced red bell pepper
1 largish lime ( this replaces lemon grass, which can be a pain to deal with)
1/3 of a block of cubed tofu
4 scallion stalks
4 lime leaves
2-3 Thai bird chili peppers
2 ramen noodle blocks (optional. I used a egg noodle version of the ramen style noodles)


Pour the broth into a large pot and bring to a boil. While it is heating up, add the lime leaves and the bird chilies. I don't suggest chopping up the chilies, as they are spectacularly hot, and this is coming from someone who sucks down sambal with the best of them. Andrew Zimmern, from bizarre foods, described these peppers as "nuclear" so be careful of them. The leaves and the peppers will be removed before serving so don't chop them or break them up. When the broth comes to a boil, add the wet ingredients. Wait till the soup returns to a boil and then add the mushrooms and the bell pepper. The mushrooms with create a much richer broth, while the bell pepper will add a mild sweetness. Let the soup continue to boil for another 5-6 minutes, and then add the cubed tofu. Now for the lime. Cut the lime in half, and squeeze out the juice from both halves into the pot. If you really want the lime flavor to stand out, grate a little of the lime zest into the soup as well. Lastly, add the scallions. Stir and lower the temperature to a simmer. Get another pot, a small one preferably, and boil 3 or four cups of water. It should come to a boil very quickly, and when it does, add the noodles. The noodles shouldn't cook more than 3 minutes. Drain the water, and spray them with a small amount of oil. Do not add them to the soup itself, place them in your bowl and them pour the soup on top. This way the noodles don't get overly soggy. Don't forget to take out the lime leaves and the chilies before serving!!!

Eat and enjoy!!

Saturday, November 17, 2007

Quick Asian Fix


The story: The story for this one is that I was hungry and in the mood for some form of an Asian dish. I took a look in the fridge and tossed together what I could find. The sauce was something of an experiment of mine. I have tried simple from scratch sauces before, with varying degrees of success. I think this one was a little different but with a nice tang to it.

The Dish: simple stir fry with a tangy sauce

1/2 pound of pasta
1 cup of broccoli
1/4 of a red bell pepper
4 scallions
1/4 cup of shitake mushrooms
1/4 cup of vegetarian chicken strips (seitan)

The sauce: ( I mostly did this one by feel so measurements are not precise)
1/2 cup of cooking sherry
1/4 cup of soy sauce
2 tbs of sesame oil
1 tsp of miso paste
1/2 tsp of corn starch
1 tsp of sugar (brown or white, doesn't matter)

As usual boil the water for the pasta. In the meantime spray a pan with oil and heat to a high temperature. When the oil is hot, toss in the peppers and the broccoli, as they tend to take longer to cook. Allow the veggies to cook for 3 to 4 minutes, and then add the mushrooms and the chicken strips. Cook for another 2 to 3 minutes and then lower the temperature. Mix all of the sauce ingredients in a separate bowl, stirring well to blend the corn starch. Add the scallions to the pan, pour in the sauce and stir. Let the veggies absorb the sauce for a minute and then turn off the heat. Drain the pasta, plate and add the veggies over.

Eat and enjoy!

A simple dish that shouldn't take more than 15 -20 minutes to make from start to finish.

Thursday, November 8, 2007

General Tso's tofu


The story: I don't really know if there is a story behind this particular dish. I suppose I might talk about the sauce for this recipe. I do not make the sauce myself, it uses the iron chef general tso's sauce. The sauce, if I might say so, is terrific. My cousin hunts for the stuff with a passion, and when he finds a store that carries it, he buys two or three bottles at a time. Other aspects of the dish are common in my cooking. The tofu, for example, is cooked in a certain way, which really makes its crisp and chewy. Other than that, its just a dish I like to make when I don't feel like spending a huge amount of time to make an easy Chinese dish.

The dish: General Tso's tofu (serves 1-2 people)

1/4 -1/2 of a standard block of tofu (cut into small cubes)
1/4 pound of spinach
1/3 cup of onion
1/4-1/2 pound of fresh udon noodles
1/2 cup of Iron chef's General Tso's sauce (specifically THIS sauce)
1/4 cup of fresh radish sprouts

To start, you need to boil some water for the pasta. When the water is boiling add the pasta, and allow to cook for 3-4 minutes. After this, drain the pasta and place to the side. Now cube up the tofu into small blocks. Take a microwavable plate or bowl and spray it with oil. This will make sure that the tofu doesn't stick to the plate. Put the cubed tofu into the microwave, and cook for 3 minutes or so. This is going to drain moisture out of the tofu, making it crisp up and allow it to become chewy. In the meantime take a frying pan and spray it liberally with oil. Raise the heat to a high temperature. Once the tofu is done in the microwave, place it in the pan. Spray a small amount of oil on the top side of the tofu. Keep an eye on it, allowing it to crisp. After a few minutes, take the onion, which should be sliced into thin ribbons, into the pan. Spray with a little more oil. When the onion begins to brown a little, add the spinach. Try to drain as much moisture from the spinach as you can before you add it into the pan. Allow it to cook for another minute or two. Then add the sauce, lower the temperature, and allow the pan to simmer. You may need to add a small amount of water to thin it out. After 5 minutes, at most, add the pasta into the pan, and toss it all together. Let it cook for another minute or two. When done, place in the bowl or plate, and add the raw radish sprouts on top. The raw radish sprouts add a really nice earthy and surprisingly hot flavor. In addition to that, you might want to add a little sambal or fresh ground chili paste. It gives it a very nice zing!

Eat and enjoy!

Tuesday, November 6, 2007

Miso noodle soup


The Story: I have been enjoying miso soup for many years now and I kept wanting to make it myself but for various reasons it never came together. The soup is a simple one, often served as a first course with sushi. The simplicity of the soup in no way detracts from the fact that on a cold night, it really hits the spot. The reason that this recipe happened now began with an episode of "Chicago tonight" on PBS. The show talked about this great supermarket , the H mart, that was opening a new location in a south western Chicago suburb. It has a huge selection of Asian foods, including a spectacular amount of fresh vegetables and seafood. Also in the market are a number of small restaurants as well as other small stores. Kountney and I discovered that there was one quite close by, in fact it was just five minutes away. We had driven by it all the time but never really knew what it was. So tonight we decided to explore it and found all kinds of goodies, including the ingredients for the miso soup. For me this soup was a whole meal, not just a first course. I was gonna make steamed red bean dumplings, but after eating a bowl of this it really wasn't necessary.

* The photo is not of the actual soup, just one that looks very similar. Ours doesn't include scallops.

The dish: Miso noodle soup
4 cups of water
1 1/2 -2 tbs of Fuero Wakame dried seaweed
4 tbs of Miso paste (we used a reduced sodium brand)
1/4 standard block of tofu
1/4 pound of fresh udon noodles
3-4 keefer lime leaves

The dish is extremely quick and easy to make. Bring the water to a boil, but drop the lime leaves into the water before it reaches a boil. When boiling, add the tofu and the noodles. 1 minute later add the dried seaweed. Allow to cook for another 3-4 minutes. Next, add the miso paste into the water and stir well. Serve hot. Eat and enjoy!

Wednesday, October 31, 2007

fabulous halloween dish


The story: Well, we've actually spend about 3 or 4 years working on this particular recipe. There were several false starts and issues of baking time but this seems to be the best version we have come up with to date. It really fills that certain void we so often feel this time of year.

The dish: Halloween perfection

1 bag of reese's peanut butter cups
1 bag of crunch bars (the hershey's kind, not the bolivian)
1 bag of butterfingers
1 bag of whoppers
1 case of mudslide
3 pounds of ice (minimum)

Find a large bowl, glass is preferable to metal or solid plastic. This allows a full view of the contents of the bowl and tends to minimize picking time. Grilling of the ingredients works for some, I like many I prefer mine raw. Empty all dry ingredients into the bowl. Place outside your door. Open the mudslide, pour over the ice. Ignore all knocks and door bells.

enjoy!

Tuesday, October 30, 2007

Mexican pizza, or the case of the spicy pancakes


The story: This recipe is a variation of an old stand by of mine, beans and rice. Unlike some versions of the dish, which tend to be just what it sounds like, my beans and rice tend to be a bit more complicated. I spend a couple of years cooking this every so often and by this point I think I've worked it out pretty well. This particular variation was more of a spur of the moment, saw an ingredient I liked at the store, kind of thing. The Mexican pizza variation was my first attempt at this and it's likely that I'll come back later and alter this blog with the little things that will make it a better dish.


The dish: Mexican pizza

1 can of black beans
1 medium Spanish onion
1-2 plum tomatoes
1 medium carrot
1/2 pound package of frozen spinach
3-4 dashes of red wine vinegar
1/4 tsp of fresh or powdered garlic
3-5 slices of Cheddar cheese or equal amount of shredded cheese
bottled jalapeño slices optional but good

1 package of corn tortillas
1 cup of white or yellow rice


As always the first thing to start with is the water boiling. In case you don't make rice very often its 2 cups of water to the one cup of rice. While you're waiting for the rice, heat up a good sized pan sprayed with oil. When the oil had reached a high temperature toss in the chopped up onion and let it soften and brown up. After the onion has cooked for 3-4 minutes, mix in the defrosted spinach and stir. While that is cooking, peel the carrot. Once the outer skin is peeled, continue peeling it into the pan. This will make the carrots cook quicker and be more tender. Next comes the beans. Drain most of the liquid in the can, and pour the beans into the pan. Stir the beans, and let them cook. Pour about 1/2 cup or so of water or vegetable broth as well as the vinegar. It helps to smush up some of the beans, the starch from the beans with help thicken the mixture. Lower the heat to a simmer, and let the pan sit for 5-7 minutes.

While the beans are simmering, take the corn tortillas and lightly spray them with oil. Lightly toast them in the oven or in a toaster oven. Layer the tortillas, beans, and rice. Then place the cheese on top and let it melt. A little hot sauce and a dollop of sour cream and Viola!

Eat and enjoy!

Sunday, October 28, 2007

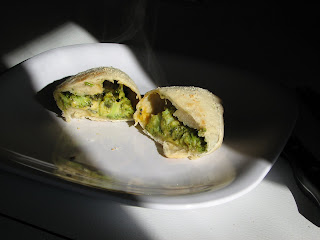
Broccoli and cheese hot pockets


The story: This one is Kourtney's brain child. She loves hot pockets and pizza rolls, but wanted to make them ourselves. Store bought pizza rolls aren't the healthiest thing, thus these beauties were born. The dough is the same as our samosa wrapper recipe. The main change is in the filling, and man what a filling it is!

The dish: Broccoli and Cheese hot pockets

the All purpose wrapper dough:
~ 2 cups of all purpose flour
~ Dash of salt
~ 10 tablespoons of water

The filling:
1 cup of sharp cheddar
1/2 of swiss or gruyere
3-4 heaping tbsp of ricotta
1/4 tsp of powdered garlic
1 cup of broccoli


Start with the dough. Mix salt and flour together then begin slowly adding water one tablespoon at a time. As you start to mix dough will look like little crumbs continue to add water until ball is formed. Wrap in plastic wrap and let set in refrigerated for one hour. This will make the dough fabulously easy to work with.

The filling is easy to do, just toss all the cheese and the garlic into the bowl and mix it. The ricotta will act as a sort of binder, letting the cheese be more workable. Roll out the dough to your desired thickness. Like the samosa, cut the dough into about a 4 square inch peice, and then roll it out a little more. Place 2 heaping tablespoons of the cheese mixture onto the dough, and then place 3-5 pieces of broccoli on top, depending on how much can fit and still close well. Again, like the samosa, make sure the seems are well sealed. You're not gonna fry it, but leaking cheese tends to lead to burning. When you've run out of wrapper or filling, place them all on a greased pan. Spray the top of the rolls too, and then shake a small amount of Parmesan onto them. It creates a great crust. Put into the oven at a 375 degree heat till the top starts to crisp. Flip them and let them in the over till the bottom crisps up to a golden brown.

When done take them off the pan and let them sit and cool for about ten minutes.

Then eat and enjoy!

Classic gnocchi (for us)


The story: I don't really know if there is much of a story behind this particular dish. We just love gnocchi and have played around with all kinds of sauces for it. Our blue cheese white sauce is a particular favorite, though not one you should have every day. Spectacular in taste but also spectacular in the unhealthiness of it. This is a more "healthy" and simple version of one of our gnocchi dishes.

Classic Gnocchi: (serves about 4)

1 packet of Gnocchi (its about a pound in size)
2 large heads of broccoli
1/2 medium Spanish onion
1-2 good sized plum tomatoes
1/2 cup of white mushrooms
1 tsp of garlic powder
1/3 cup of olive oil
6 or 7 large fresh basil leaves
cheese to taste

Start a pot of water for the gnocchi. You don't need a whole lot of water for this, the gnocchi isn't in there long. In the mean time, spray a pan with oil and bring it up to a high heat. When the pan is hot, toss in the onion, which should be cut into thin slices. Let that brown up a bit. If the pan was properly hot it should not take long at all. Next toss in the mushrooms, cut to what ever size you like. You want to let the mushrooms cook down a bit before you toss in the broccoli and the oil, otherwise the mushrooms will just taste of grease. When they have cooked, toss in the broccoli first and let it cook for 3-4 minutes. After that, pour in the oil and flavor with the garlic powder. At this point, just lower to temperature to simmer, and let it sit. By this point, hopefully the water will be boiling, so add the gnocchi. When the gnocchi floats at the top of the water, its done. Like I said it won't take long to cook. When its all floating, use a large slotted spoon to mix the gnocchi with the veggies. Toss in the chopped tomato and basil, stirring for another minute or two. You don't want the tomatoes or the basil to cook much. The raw flavor is much more powerful. Just grab a plate or bowl, toss on a little cheese like Parmesan, and you're done.

Eat and enjoy!!

Friday, October 26, 2007

Samosa! Home made street food!

A bit of background- I grew up in West Virginia where exposure to ethnic food was practically non-existent. Americanized Chinese food, "Italian" dishes were the norm for something exotic, Mexican especially was tempered for our American pallets. Now to the samosa! Indian cuisine is simply amazing! The flavors of this yummy cuisine with the deep fried flavor that a country girl loves!

If you click here you can learn far more about this dish than I could tell you.

Samosa Filling
~1 teaspoon of the following
~Coriander
~Cumin
~Curry
~2 teaspoons of garam masala
~Dash of salt and pepper
~Ginger and Onion (this really is to suit ones own taste I would however recommend a least one teaspoon of grated ginger)
~Half cup of peas (frozen work best)
~Potatoes (roughly 8 baby red potatoes)
~ oil (to mix in the filling for binding)

Samosa Wrapper
~ 2 cups of all purpose flour
~ Dash of salt
~ 10 tablespoons of water

This dough is a great recipe and we make great use of it as you will see in recipes to come

Start with the dough. Mix salt and flour together then begin slowly adding water one tablespoon at a time. As you start to mix dough will look like little crumbs continue to add water until ball is formed. Wrap in plastic wrap and let set in refrigerated for one hour. This will make the dough fabulously easy to work with.

Onto the filling!
Microwave potatoes until they can be easily mashed. Mash the potatoes then add all spices. We recommend grating the onion as well this gives the filling a smooth consistency. Mix well. Thaw peas if needed and add to potatoes stir until well mixed.

Once dough has set for one hour roll out dough to desired thickness, we recommend the thinner the better, cut dough into 4 inch squares. Place two heaping tablespoons in center of square and fold over into triangle, square or whatever your heart desires but make sure the seams are well sealed.

Now to the yummy deep frying!
If you have a deep fryer use it. If not try this method. Choose a small pot that holds no more then 4 cups. Fill with pot with enough oil to half or less, making sure samosa is half way immersed in oil. Raise oil to high heat, test oil using ones own method. Gently lower one samosa into oil quickly spooning oil on top while bottom cooks in oil. This makes the process goes much quicker and gives it an even crust. Allow to cool and drain. Yogurt dill sauce always good with this great snack or meal.


Thursday, October 25, 2007

baby bella mushroom ravioli in a champagne cream sauce


The story: Over the summer I, that being Gabe, was living with my relatives in New Jersey, and taking a class over in Manhattan. It was during that time that I took to cooking nearly every night, and on occasion felt the need to expand my repertoire. This dish comes from one of those nights. My cousin mentioned that she really loved this particular dish from a restaurant and she asked if I could recreate it for her. And thus a series of food shopping trips ensued, including a trip to the local liquor store, and a recipe was found. This recipe is not quite the same; in this case, Kourtney and I created the ravioli from scratch instead of using store-bought ones. Store bought works just as well though, and if you're pressed for time, it less clean up and a lot quicker.

The dish: Baby bella mushroom ravioli in a champagne cream sauce

Ravioli: (makes 6-8 large ravioli)
2-2 1/2 cups of Baby bella mushrooms
1/4 cup of olive oil
1 pack of eggroll wrappers
1 egg

Sauce:
1 cup of white or button mushrooms
2-3 large shallots
1/2 cup of cream
1/2 cup of champagne ( A cheap bottle works just fine, just mind the cork)
1/2 cup of Parmesan cheese
3-4 whole scallions
2 tbsp of butter or margerine
1 tsp of mixed Italian herbs
1/2 tsp of powdered garlic
1/4 tsp of coarse ground black pepper
1/2 tsp of plain flour mixed with 1/4 cup of water

To begin, put up a pot of water to boil the ravioli in. Then clean and chop up the bella mushroom. . Quickly saute the mushrooms in a pan sprayed with a little oil on a high heat. When cooked, toss into a blender with olive oil. Blend until a creamy paste. Remove the paste from the blender. Nows the time to make the ravioli. Take the eggroll wrapper and place it on a plate. Take a good tablespoon or two of the mushroom paste and place in the center. Now its time for a quick egg wash. Give the egg a quick beating and LIGHTLY spread the wash on all the edges of the wrapper. Fold the wrapper, and use a fork to crinkle the edges together so it can be boiled. Repeat the steps till you've used up all the mushroom paste. You're gonna have a number of wrappers left over, so just bag them and use them another day.

Nows the time to begin the sauce. Melt the butter in the pan on a high heat. Thinly slice the shallots and add to butter when it begins to bubble and brown. Let the shallots sit for a bit and let them brown, stirring only ocationally. When they look done, toss in the white mushrooms and toss them with the shallots to coat them in the remaining butter. Add the spices. Lower the temperature to a medium heat, and let the mushrooms cook for 3-5 minutes. After add the champagne, and then the cream two minutes after that. Add the scallions, and then lower the heat to simmer. Once the temperature has reduced, add the Parmesan cheese. Stir it in and then leave the temperature as low as possible.

By this point the water should have come to a rolling boiling. Ease only one or two ravioli in the pot at a time. They cook very quickly, staying in water only for 1 1/2-2 a piece. When done, take them out of the water and plate immediately, as they tend to get sticky. Pour the sauce over, and enjoy!!

Wednesday, October 24, 2007

Reasons to marry my fiance

He's handsome
He's smart
He takes care of me


and the food....oh the food!

It's amazing!

Quick throw together pasta that fills that void inside you


The story: After a long day of going around town, going to the beach among other places, we were dead tired and felt like making something simple. Now I will admit that our version of simple cooking is really not what others might consider it. My father often says that I can never leave anything alone and just eat it, but then what foodie can? Simple in this case was that we used some easily obtained, semi-premade foods and jazzed them up a bit. The night previous to us making this dish we had seen one of those bobby flay cooking throw downs and it really put us in the mood for spaghetti and meatballs. As I am a vegetarian, its not quite the same but we made do.
A quick side note effected our desire for this dish. It was a cool day out, peaking in the low fifties, and quite windy. As it might in others, it creating a desire for something hot and filling, reminding us of our childhoods.

The dish: Spaghetti and "meat"balls with romaine salad and spiced croûtons
*note: several of the items that will be listed are pre-made brand name items. (not routine for us, but like I said, we were hungry)

Spaghetti and "Meat"balls
1/2 pound of angel hair pasta
18 oz. of DiNicola spicy marina sauce
1/4 cup of Bartunura Moscato wine
1/4 cup of part skim ricotta cheese
~2 tsp of garlic powder
3/4-1 cup of morningstar farm veggie ground
4-5 morningstar farm sausage links
3 dashes of grated Parmesan

Romaine salad
1 head of fresh romaine lettuce
1 med. carrot
1/2 -1 cup of red cabbage

Spiced croûtons
1/2 a large loaf of fresh baked Italian bread (ours was 4-5 days old, so already a bit hard)
1/4 tsp onion powder
1/4 tsp garlic powder
1/4 tsp of Za'atar (an Israeli/Med. spice mix containing hyssop)
1 tsp of mixed Italian herbs
1/4-1/3 cup of virgin olive oil

As usual, start the water for the pasta. While you're waiting for the water to boil, nows a good time to start on the croûtons. Before starting the bread, preheat the oven to 375 degrees. Slice up the bread and cut up the slices into smaller pieces. I find that the optimum size for them seems to be roughly about half again the size of a die (lol, singular for dice). When all the bread is cut up, toss them into a bowl. Pour the olive oil on top, and then quickly start tossing the bread to help the oil spread evenly. Then simply toss in all the spices and toss again, coating the bread. Foil up a pan and lightly spray with oil. Dump the bread crumbs onto the pan and put in the oven. Hopefully the water is boiling by this point, so add the pasta.

Onto the sauce. Take a sauce pan, and heat up a little oil in it, spray oil works just fine. Toss in the frozen veggie ground and let it heat up in the pan at a high flame. When defrosted add the wine and stir, lowering the heat a bit. Now is the time to add the tomato sauce. Let the sauce heat up a bit, and then mix in the ricotta. Microwave the sausage links for about a minute or so, chop roughly and then add to the sauce. Lower the heat and let the sauce simmer.

Nows a good time to check to see if the pasta is done. When the pasta has reached the texture that you like, drain the pasta. When the pasta is properly drained, put the pasta in the pan with the sauce and mix liberally. Plate the salad and the pasta, dash lightly with Parmesan cheese, and Viola, a fine meal after long chilly day!


Monday, October 22, 2007

Mac and cheese with a green flair

Dinner: Mac and cheese with a green flare.
1/2 box of pasta, we used shells, though anything similar would work
1/3- 1/2 pound of fresh string beans. canned just won't have the same crunch to them.
1/3 pound of peas. these do not need to be fresh, frozen works just as well.
2-3 large shallots
~1/2 cup of milk. we used skim and it worked great
1/2 cup of shredded mild cheddar cheese
~ 1/2 of gruyere cheese
black pepper,garlic powder to taste
2-3 shakes of tabasco sauce (to taste)
enough bread crumbs to cover the surface of it.

Cook the pasta. I don't think that really needs instructions. In the meantime start another pot of water. You don't need a lot, you just need enough to cover the green beans to blance them. Once the water is boiling toss in the green beans and let them cook for about 3 to 4 minutes. Fill a bowl that can hold the beans with some ice water. This will shock the beans so they will stop cooking. While you are waiting for that, its a good time to start on the shallots. In pan heat some oil or butter and toss the thinly cut shallots in. Let them cook and brown. Once browned, toss in the cooked green beans (cut into thirds) and the defrosted peas. Add a table spoon or so more of oil to help coat everything. Now its time to add the pasta. (We ended up cooking this in the pan, but you can just as easily put it in a dish for baking it in the oven.) If you are doing it in the pan add the pasta first, if not then just create the cheese sauce first. Mix the pasta in the pan, tossing it with the vegtables. Lower the heat to low, and slowly add the milk. Continue to stir it, while adding in the cheeses, allowing them to melt and coat the veggies and the pasta. When the cheese is finally melted and evenly coated, its time to coat the top with breadcrumbs for that nice crunchy crust. When coated then either let it sit on the stove for another few minutes on the low heat, or place it in the oven at 350 degrees for 10-15 for a really nice crunch.

Eat and Enjoy!